Mastering Dust 2: Essential Strategies for Winning Clashes
Mastering Dust 2 requires a deep understanding of its unique map dynamics and the strategic positioning of both teams. One essential strategy is mastering the use of grenades, particularly smoke and flashbangs. For example, throwing a smoke grenade at mid doors can block the vision of enemies holding from Catwalk, allowing your team to push more safely. Additionally, coordinating grenade throws with your teammates can create openings for your team to execute site takes effectively. Remember to always communicate with your team and call out your intentions before engaging in key areas like A site or B site.
Another vital aspect of winning clashes on Dust 2 is map control. Establishing dominance over critical areas such as Long A and Mid can heavily influence the outcome of rounds. Consider using a mix of aggressive plays and retreat tactics to maintain pressure on your opponents. Employ strategies like two players holding Long A while the rest of the team pressures B can stretch defenses and exploit weaknesses. In essence, effective map control, coupled with smart communication and grenade usage, will significantly improve your chances of emerging victorious in the famous battleground of Dust 2.
Counter-Strike is a popular tactical first-person shooter game that pits teams of terrorists against counter-terrorists in a variety of objective-based scenarios. Players can choose different weapons and strategies to defeat their opponents. To learn more about the competitive modes in the latest version, check out what is premier cs2.
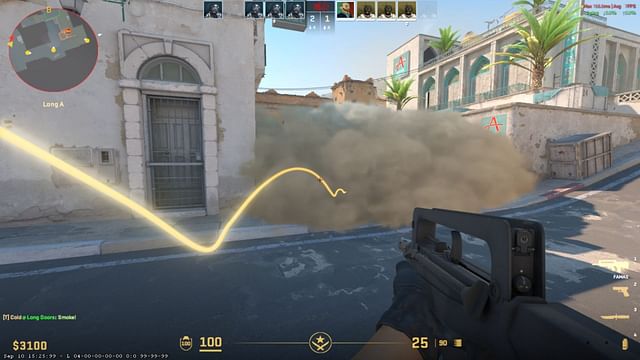
Top 10 Smoke Grenade Throws You Need to Know on Dust 2
When it comes to dominating the legendary Dust 2 map in CS:GO, mastering smoke grenade throws is essential for gaining an advantage over your opponents. Here are the Top 10 Smoke Grenade Throws you must know:
- Top Mid to B Doors: A perfectly placed smoke grenade allows your team to advance through the Mid area without being spotted. Stand at the top of Mid, align your crosshair with the top of the wall, and throw it for a clean blockage.
- B Site Smoke: Covering the entry to B Site is crucial. Stand near the B Tunnels entrance and aim for the edge of the B doors to throw your smoke perfectly.
- A Long Smoke: To block visibility from A Site, throw a smoke grenade from the A Long corner, aiming at the wall like a pro.
- CT Spawn Smoke: A smoke grenade thrown from T Spawn can obstruct the view of CT spawn, allowing for safer site takes.
- Upper Tunnels Smoke: When advancing from B Tunnels, throw a smoke to cover the upper tunnels, ensuring a secure approach.
- Cross Smoke: This throw prevents enemy snipers from taking you out in A Site. Align your throw just right from A Long.
- Window Smoke: For an easier approach to Mid, a well-placed window smoke can confuse enemies stationed there. Aim high and hit that spot!
- Behind the Box on B: This smoke is perfect for blocking off enemy vision from the box on B site, providing cover for planting.
- Double Doors Smoke: A smoke grenade that perfectly lands at the double doors can help your team initiate a push without being spotted.
- A Ramp Smoke: Covering the A Ramp area is vital, and a grenade thrown from T side can provide crucial cover for your team to move up.
Proper execution of these smoke grenade throws can mean the difference between victory and defeat on Dust 2. Practice these throws consistently to improve your game and communicate with your teammates to maximize efficiency!
How to Engage Effectively in Dust 2's Key Areas: Tips for Every Role
Dust 2, one of the most iconic maps in Counter-Strike: Global Offensive, demands that players engage effectively in its key areas to maximize their potential. For Entry Fraggers, rushing through mid and applying pressure on both A and B sites early in the round can create advantageous numbers for your team. Ensure that you check Common Sniper Locations, such as the A Site ramp and B plat, to make use of your teammates' utility. If you are playing as a Support player, remember to smoke off choke points and throw flashbangs to allow your team safe passage through key areas like Long A and Upper B Tunnel.
In addition to your role-specific strategies, communication is crucial in any engagement on Dust 2. Use your microphone and in-game chat to call out enemy positions and make situational decisions. For example, if you notice multiple opponents at Catwalk, inform your team to either rotate or set up an ambush. As a AWPer, maintaining control of the Middle zone can provide your team with critical information and a significant advantage in engagements. Ultimately, understanding each area's dynamics and adapting your strategy based on your role will enhance your team's overall performance.